Back to Technical Index
C64-Joystick tester
When you read the previous section carefully, you should know that most joysticks are nothing more than 5 digital buttons, producing
a connection between pin 8 and the direction wire when pressed. That makes testing them pretty easy (simple measure the resistor value between
pin 8 and e.g. 1 and see if it changes to Zero when you press the direction).
Still you might want to build a real tester. You might also want to give the Joystick the P5V in case it needs them.
I didn't build this tester but I will give you the instructions for one.
Ingredients
Of course you need a 9Pin-male connector to plug your joystick into. If you want to view the status of the buttons with LEDs, you should get 5 LEDs
(add two if you want to test the Extra Buttons as well). You will also need resistors for the LEDs. Most cheap LEDs want an amperage of 20mA and a voltage
depending on their color:
| Color | Voltage | necessary resistor |
|---|
| red | 2,25 V | 137.5 R |
| green | 2,2 V | 140 R |
| yellow | 2,1 V | 145 R |
Of course you won't get those resistor values so take one size up or down. For this application also the cheapest resistors (high tolerance and low Watt) will do.
If you use low-current-LEDs, other colors or something, forget those values, find out your data and calculate the value yourself (subtract the LED-voltage from 5V
and divide by the LED-amperage)
You will also need a power supply of 5V (and appropiate connectors). For a pretty tester also get a small box and drill holes for LEDs and the connectors in them.
If you want to choose whether to test the Extra Buttons or not (might be problematic with POTs) you could get two small switches (3 pins each).
If you want to test the POTs as well, you either need displays for the values or you add some banana plugs so you can connect an external Multimeter.
If you want to test a light pen - I can't help you. I don't have information about that. If you find out anything - mail me!
Building
Okay, I assume that you know how to solder, have the right holes in your box and only need the electrical information:
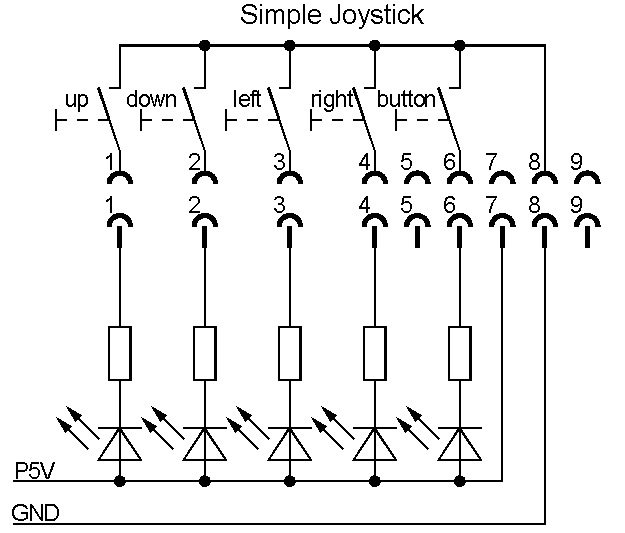
Of course you need to connect P5V from your power source to Pin 7 of the connector.
You also need to connect GND from your power source to pin 8 of the connector.
You should solder the resistors directly to the LEDs. Just remember where kathode and anode is. I use to solder the resistor to the kathode and then shorting
the wires so that kathode is still the shorter end.
Connect the anodes of all LEDs together and add a connection to P5V
Connect the kathode of each LED to the Pin of the connector. (e.g. LED for UP must go to Pin 1)
If you want to test the POTs also add a connection from P5V to a banana plug (I like to use a red one for this)
After that you should connect the POT pins (5 and 9) to some other banana plugs (I like to use black ones for this)
If you to switch between testing the Extra buttons and the POTs, put it between the two alternatives.
Scheme
Okay, I admit that such things are easier with a scheme:
- Simple 1-Button Joystick:

- Simple 3-Button Joystick:

- Paddle: (connect your Ohm-meter between red and black)

- Able to test everything:

In the current switch positions you test the extra buttons. Flip the switches to test the paddles like above.


